living kitchen cooks membership
Let’s Start Cooking Together!
Week 12 (July 20th): Menu at a Glance


Risotto with Asparagus, Shallot and Sweet Potato
Parsley Macadamia Nut Pesto w/ Rapini
Rice Noodle Salad with Tahini Miso Dressing
Blueberry Buckwheat Pancake Muffins
Grocery List: view PDF and print
Print or Save All Week 12 Recipes (PDF)
Your Cooking Playlist
The Recipes:
1. Chickpea Flour Galette w/ “Goat Cheese”

Chickpea Flour Galette w/ “Goat Cheese”
If you've ever made our famous quiche recipe in The Living Kitchen cookbook, then you've had this crust before. This is a slight variation of the crust (the original one includes sesame seeds too) and it works really well as a galette. The best part about using chickpea flour in the crust, is that it's high in protein so works well as a filling plant-based meal.
For the dough
- 1 cup chickpea flour
- 1/2 cup rolled oats
- 1/4 cup extra virgin olive oil
- 1/4 cup water
- 1/2 tsp sea salt
For the "goat cheese"
- 1 cup slivered or sliced almonds
- 1 tsp nutritional yeast
- 1/4 tsp sea salt
- 1/2 cup water
For the veggies
- 1 heaping cup leeks (chopped)
- 1 small shallot (diced)
- 2 heaping cups kale (chopped)
- sea salt and pepper
- 1/2 a zucchini (sliced in thin pieces)
-
Preheat oven to 350 and line a pie dish with parchment paper. If you don't have a pie dish, you can make this on a baking sheet instead.
For the dough
-
Mix together the ingredients for the dough in a bowl. You can use your hands to bring everything together. You'll be able to roll the mixture into a ball.
-
Press the dough into the parchment paper and spread out with your fingers to the edges of the pie dish (or on baking sheet form the dough into a circle with your fingers). Set this aside while you prepare the "cheese'" and veggies.
For the "cheese" and veggies
-
To make the "cheese," place all of the ingredients in a high speed blender (such as a Vitamix) and blend until smooth and creamy.
-
Heat some extra virgin olive oil in a skillet. Once the oil is hot, add in the leek and shallot and saute for around 4 to 5 minutes. When the leeks and shallot are softened and lightly cooked, add in the chopped kale and saute for another minute so that it wilts.
-
Now you're ready to put everything together. Spread the "cheese" over the dough, creating a layer.
-
Spread the cooked leek, shallot and kale medley over top of the "cheese."
-
Spread the pieces of zucchini over top.
-
Then you'll carefully use your fingers to fold the edges of the dough over toward the center of the filling. So, you'll still be able to see most of the veggies in the center.
-
Bake for 30 minutes, until the crust is lightly browned and fully cooked.
Substitution Guide:
- “Goat Cheese”: you can buy pre-made almond “ricotta” cheese such as by the brand Kite Hill. You also could use a pre-made cashew cheese instead. Or, if you eat dairy, you can use real goat cheese
Prep Guide:
- “Goat Cheese”: if you’re making this, you can make it the day before making the galette. It’ll keep in the fridge for a few days.
- Veggie filling: you can saute this earlier in the day and keep in the fridge until ready to compile the galette
2. Risotto with Asparagus, Shallot and Sweet Potato
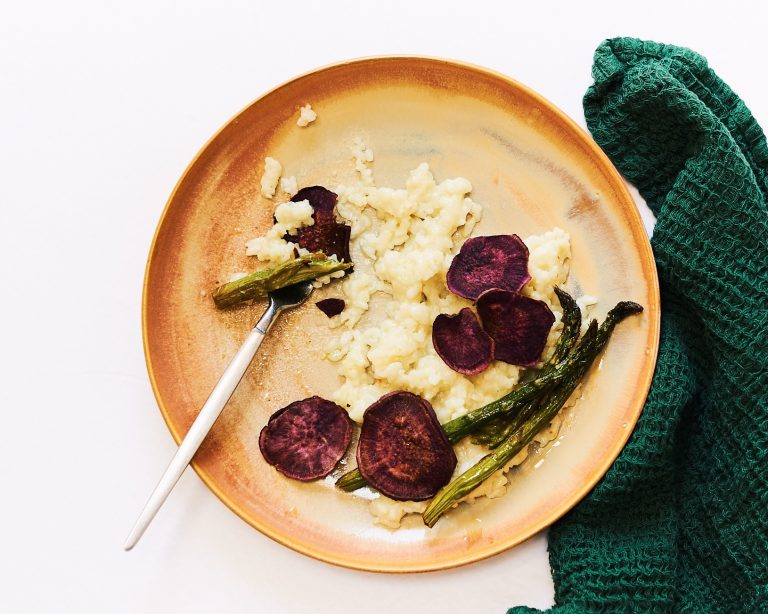
Risotto w/ Asparagus, Shallot and Sweet Potato
This is a comforting, cozy meal that's still light enough for hot summer nights. If you've never made risotto before, don't worry, it's actually incredible easy to make. This is our simple version of risotto, but if you have some white wine and/or butter, feel free to add them in for extra richness of flavour (add 1/4 cup of white wine once the rice is in the pot and stir until the liquid evaporates. Then continue with adding the broth).
- 2 Tbsp extra virgin olive oil
- 1 small or medium shallot (diced)
- 1 cup Arborio rice
- 3.5 to 4 cups vegetable broth
- sea salt and pepper
Veggies
- 1 bunch asparagus (trimmed)
- 1 medium sweet potato (sliced in thin discs)
- sea salt and pepper (to taste)
Optional Protein
- 1 small can chickpeas or white beans ((1.5 cups beans))
- 1 lb chicken breast or thigh (skinless and boneless)
- 1 lb scallops or white fish
For the veggies
-
Preheat oven to 375 and line a baking sheet with parchment paper.
-
Spread the asparagus out on the baking sheet and toss with some sea salt, pepper and extra virgin olive oil. Slice the sweet potato in thin discs and spread them out on another area of the baking sheet. If you don't have enough space, you can use 2 baking sheets. Rub the sweet potato pieces with some sea salt, pepper and oil as well.
-
Roast for 15-20 minutes, until the asparagus are green and tender. You'll want to leave the sweet potatoes in a little while longer, around another 5-10 minutes until they are cooked.
For the risotto
-
Heat the extra virgin olive oil in a large, wide, shallow pot (a saucepan works well here). Once the oil is hot, add the shallot and saute for a few minutes.
-
Add in the rice and saute for around 1 minute. Then you'll begin the process of adding broth. Add 1/4 cup of broth and stir the rice. Simmer for a minute until the liquid is fully absorbed. This will only take a minute or two.
-
Add another 1/4 cup of broth and stir the rice, cook until the liquid is absorbed. Continue this process of adding broth, stirring and simmering until the liquid is absorbed. This will create a creamy rice mixture in about 15-20 minutes.
-
Once the rice is soft but still a bit al dente, it's ready. You don't want it to get mushy or overcooked.
-
If you're adding in a protein option, sear the chicken or scallops or white fish in a skillet with sea salt, pepper and extra virgin olive oil to cook. You can always add a squeeze of lemon juice if you like. If you're using white beans or chickpeas, you can either add these directly into the risotto or give them a sear in a skillet with sea salt, pepper and extra virgin olive oil as well (they're also good with some lemon juice).
-
Serve the risotto out on plates and top with the asparagus and sweet potatoes. Add the cooked protein of choice to each plate if you'd like.
Substitution Guide:
- Asparagus: Any green veggie can work here, such as zucchini or broccoli. Green beans could also work.
- Arborio Rice: This really is the classic rice for making a creamy risotto. But, if you don’t have it, you could use normal white or brown rice instead. It’ll just be a little different than the original recipe. You also could try making this with cauliflower “rice” for a grain free option (you won’t need to add as much liquid for that).
- Shallot: yellow onion (around 1/2 cup) or even some leeks could be used in place.
3. Parsley Macadamia Nut Pesto
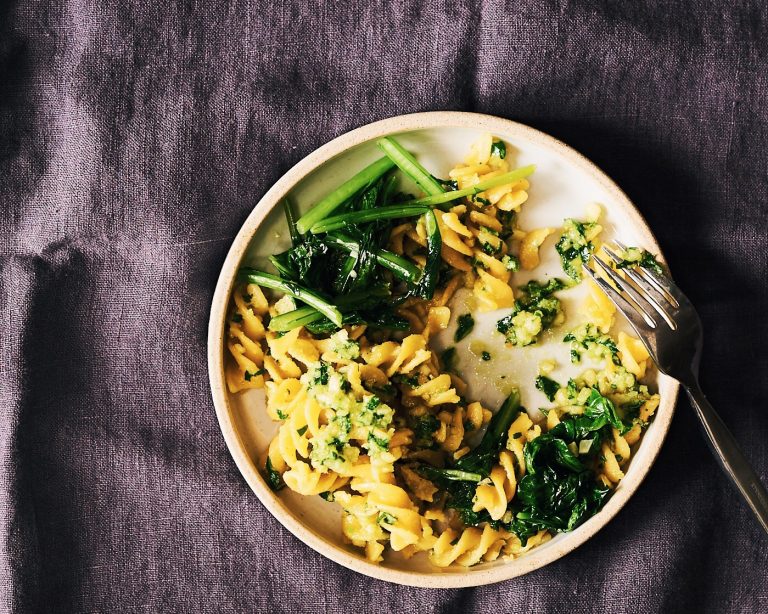
Parsley Macadamia Nut Pesto w Rapini
There are so many different ways to make a delicious pesto and we really like getting creative with the types of herbs and nuts we use. It doesn't have to just be basil and pinenuts. One of the reasons we wanted to make a parsley based pesto is because we so often end up with tons of leftover parsley after using a small amount in other recipes. Macadamia nuts are naturally a little sweet and creamy, so they pair well with the bite of lemon and garlic.
For the pesto
- 3/4 cup macadamia nuts (toasted)
- 1.5 cups parsley (chopped roughly)
- 1/2 cup extra virgin olive oil
- 3 tsp lemon juice
- 1 to 2 cloves garlic (minced)
- sea salt and pepper to taste
For the rapini
- 1 bunch rapini (broccoli rabe)
- 3 to 4 cloves garlic (sliced)
- 2 Tbsp extra virgin olive oil
Protein Options
- 4 servings legume based pasta ((such as chickpea or lentil pasta))
- 1 lb chicken breast or thighs ( boneless and skinless)
Protein Option
-
If you're making the legume based pasta, bring a pot of water to a boil and follow directions on the package to prepare it. If you're using chicken as the omnivore protein, season with sea salt and pepper and then sear in a skillet with some extra virgin olive oil until cooked through.
Pesto
-
Add all of the pesto ingredients to a food processor and pulse for around 30 seconds until everything is finely chopped and you get a nice pesto texture.
Rapini (broccoli rabe)
-
Heat extra virgin olive oil in a skillet and add the garlic for 30 seconds once the oil is hot.
-
Add in the rapini and saute for around 5 minutes, or until wilted and cooked. Season with sea salt and pepper to taste.
Compiling Together
-
Once all of the components are ready, toss the cooked pasta with pesto or spread pesto over top of the cooked chicken.
-
Serve with the cooked rapini.
Substitution Guide:
- Macadamia Nuts: you can sub other types of nuts instead. Pinenuts, walnuts, almonds all work well. Or if you need a nut-free option, you could use sunflower seeds.
- Rapini (broccoli rabe): you can use broccoli instead or broccolini. Any leafy green will work too, such as kale, collards or spinach.
Prep Guide:
- You can make this pesto several days in advance of using it. It keeps well in the fridge.
4. Rice Noodle Salad with Tahini Miso Dressing
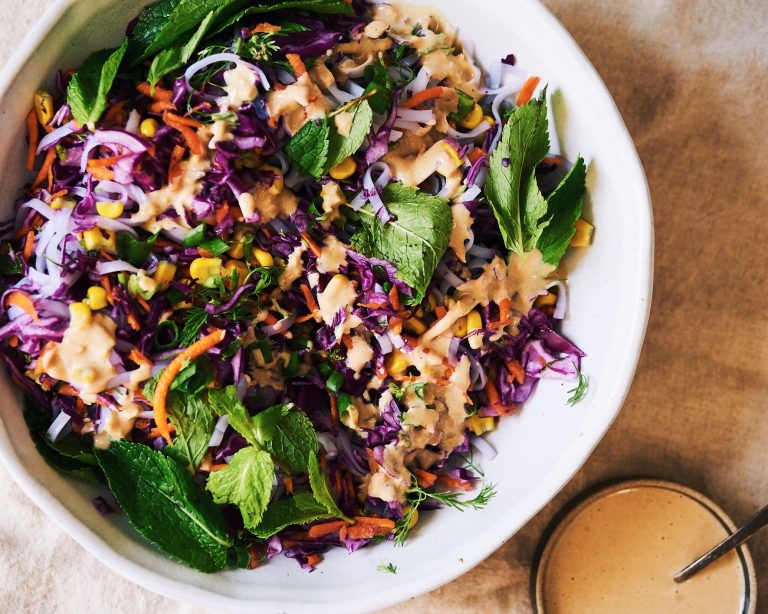
Rice Noodle Salad w/ Tahini Miso Dressing
Salads are the ultimate meal in the summer time and this recipe does not disappoint! We love using rice noodles in salads because they are quick to make and work well in chilled or room temperature recipes. You can really use any veggies that you like or have instead of the ones we listed, just make sure to include some sort of crunchy veggie (like the cabbage and carrot) because they balances the soft texture of the rice noodles and makes the salad more interesting.
- 2 cups purple cabbage (slivered or shredded)
- 1 cup carrots (shredded or grated)
- 1/2 cup corn (sliced off the cob or frozen)
- 1/4 cup mint leaves
- 1/4 cup cilantro OR basil leaves
- 1 green onion (chopped)
- 4 oz rice noodles (Pad Thai thickness)
Dressing
- 1/3 cup tahini
- 1.5 Tbsp miso paste
- 1.5 tsp rice vinegar
- 3/4 tsp ginger (grated or minced)
- 1.5 tsp maple syrup
- 1/3 cup water
Optional Protein
- 2 cups cooked chicken breast (chopped)
- 12 cooked shrimp (peeled and deveined)
- 1 small block tofu (cut in cubes)
-
Prepare the rice noodles according to package instructions.
-
Prepare the vegetables. If you're using corn on the cob, steam 1 ear of corn in a pot with some water until it's cooked. Then slice the cooked kernels off the cob. If you're using frozen corn kernels instead, you can quickly cook them in a small pot with a spoonful of water or around 3 minutes, or until no longer frozen. Let the corn cool down before adding to the rest of the veggies.
-
Stir together the ingredients for the dressing.
-
Toss together all the veggies in a large bowl. Once the noodles and corn are cool, toss together in the bowl. Add in the dressing gradually and toss all together to season the veggies well. You can always add more dressing if you want a stronger taste. If you'd like to add in one of the optional proteins you can add into the salad at the end.
Substitution Guide:
- Veggies: Feel free to swap in other veggies instead. Bell peppers, cucumber, radishes, salad turnips and kale or baby spinach would all work well here.
- Rice noodles: If you don’t want grains, you could use zucchini noodles or carrot noodles instead. GF linguini noodles could also work or soba noodles for an alternate grain option
- Fresh Herbs: you can use cilantro instead of basil or mint
Prep Guide:
- You can make the dressing in advance and keep in the fridge for several days. For leftovers, it’s best to store the dressing in a seperate container from the salad, so it doesn’t get mushy/wilted.
5. Mint Chip Avocado Pudding
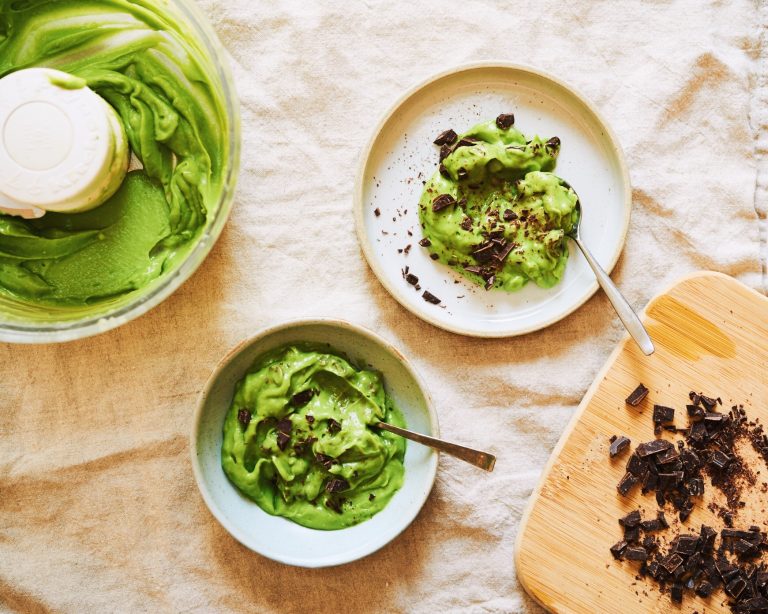
Mint Chip Avocado Pudding
This is one of the easiest recipes to whip up ever, but so delicious. Inspired by mint chip ice cream, the mint is cooling and refreshing for the summer heat. If you prefer a colder, more ice cream style experience, you can actually freeze the pudding for 1-2 hours before eating.
- 2 avocados
- 3 Tbsp coconut beverage (or other dairy free milk)
- 1 to 2 Tbsp maple syrup (add more to your taste preference)
- 1 drop food grade peppermint essential oil (or use 1/2 tsp peppermint extract)
- 1/4 tsp sea salt
- 1/2 cup dark chocolate bar, chopped (or use chocolate chips )
-
Scoop out the flesh of the avocadoes into a food processor. Add all of the other ingredients, except for the chocolate.
-
Blend in the food processor until smooth and creamy.
-
Then stir in the chopped chocolate at the very end (don't pulse it).
-
This tastes best when it's cold, so put the pudding in the fridge for 1 to 2 hours to cool down before eating. Alternatively, you can place in the freezer for 15-20 minutes. Or, if you want the mixture to be more similar to ice cream, go ahead and freeze for 1 to 2 hours.
Substitution Guide:
- Dark chocolate bar: use chocolate chips instead
- Peppermint oil: use peppermint extract instead
Prep Guide:
- Since avocado browns easily, this recipe is best eaten the day it’s prepared. However, we have eaten it leftover for 2 days after preparation (storing it in the fridge). It’ll turn a little brown on top, but you can scoop that layer off or eat if the discoloration doesn’t bother you.
6. Blueberry Buckwheat Pancake Muffins
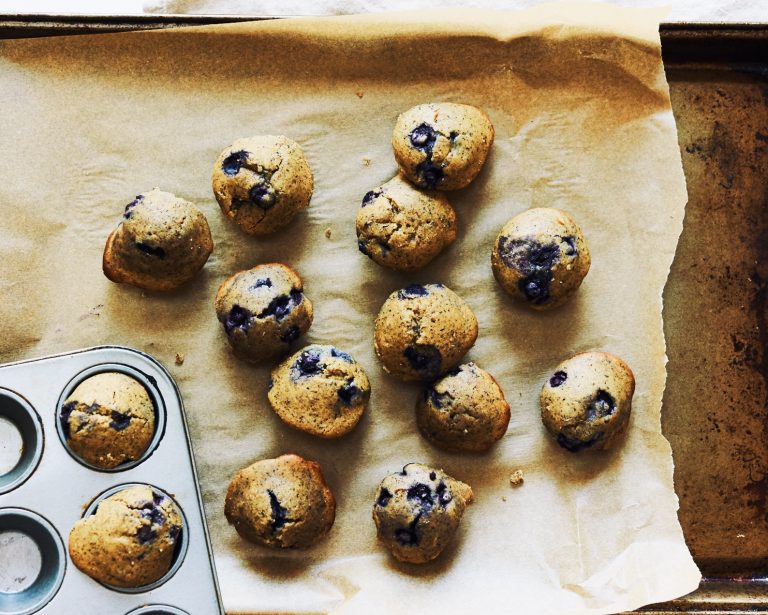
Blueberry Buckwheat Pancake Muffins
We love pancakes, especially buckwheat pancakes, and this recipe captures the taste of them in muffin form. These muffins work really well for breakfast or as a snack because they aren't too sweet. If you're eating them the day after (or several days later) we recommend toasting them up in the toaster oven for a few minutes. They're delicious with some butter or coconut oil.
- 1/2 cup buckwheat flour
- 1/2 cup brown rice flour
- 1 tsp baking powder
- 1/4 tsp sea salt
- 2 eggs
- 1/4 cup coconut oil (melted)
- 1/4 cup coconut beverage (or other dairy-free milk)
- 1/4 cup maple syrup
- 1 cup blueberries (fresh or frozen)
-
Preheat oven to 375.
-
Combine the dry ingredients together in a mixing bowl.
-
In another bowl, whisk the eggs and then stir together with the melted coconut oil (make sure it's not too hot or it could cook the eggs), coconut beverage (or other dairy free milk) and maple syrup.
-
Fold the dry ingredients into the wet ingredients. If you find the mixture is really thick, you can add 1 to 2 Tbsp of additional coconut beverage (or other dairy free milk). You want the mixture to be like a very thick pancake batter (thicker than if you were making pancakes). Then fold in the blueberries.
-
Pour the batter into a mini muffin tray, lined with muffin liners. Alternatively, you can bake this in a normal muffin tin instead (the bake time will be longer, add another 10 minutes).
-
Bake for 15 minutes. Check with a toothpick or knife to make sure it comes out clean from the center of a muffin. Depending on your oven you might need to bake a few minutes longer.
Substitution Guide:
- Blueberries: you can swap in another type of berry instead, raspberries or chopped strawberries would work well instead.
- Brown rice flour: you can sub almond flour or gluten free all-purpose flour.
© 2020 The Living Kitchen Wellness Group